Thank You Page
What Is the Thank You Page?
The "Thank You" page is what respondents see after they click Complete on the last page of a form. Unless you change it, it shows a single line — "Thank you for completing the survey" — in the respondent's language.
The moment right after submitting is when respondents pay the most attention to what you say, so a generic line wastes it. A custom Thank You page can confirm that the answers arrived and explain what happens next, thank the respondent by name, invite a happy customer to leave a review, reassure an unhappy one that someone will be in touch, or hand the respondent back to your website.
In Endatix Hub, you set it up in the Form Builder: write the page's content in the survey's "Thank You" Page settings, add rules in the Logic tab to show different content for different answers, and — if respondents should continue somewhere else — enter a link to redirect them to.
How It Works
- The page appears as soon as the respondent clicks Complete. Hub saves the submission in the background and confirms it with a short The results were saved successfully! message at the bottom of the page.
- The content is HTML. Use headings, paragraphs, links, lists, and images to lay out the page. Plain text without tags works too.
- Answers can be piped in. Placeholders such as
{first_name}are replaced with the respondent's answers, just like in question titles. See Text Piping. - Rules choose between versions. Each rule pairs a condition with its own markup. The page uses the first rule whose condition is true, and the default markup when none is.
- The survey header stays. The form's title and logo remain at the top of the page.
Settings at a Glance
All Thank You page settings are in the Designer tab: click an empty area of the design surface, then click the "Thank You" Page icon in the category bar on the right of the Property Grid.
| Setting | What it does |
|---|---|
| "Thank You" page markup | The default content of the page. See Writing the Page Markup. |
| Dynamic "Thank You" page markup | Rules that replace the default content when their condition is true. You can also create them in the Logic tab with the Set "Thank You" page markup action. |
| Redirect to an external link after submission | A web address that respondents are sent to once their answers are saved. See Redirecting Respondents to Another Page. |
| Dynamic external link | Rules that send respondents to a different address when their condition is true. |
| Show the "Thank You" page | Has no effect in Hub: published forms always show the page. See Important Considerations. |
| Markup to show if the user already filled out this survey | Shown instead of the form to a respondent who has already completed it in the same browser. Works only together with Limit to one response in the survey's General category. See When Respondents Return to a Completed Form. |
| Markup to show while survey model is loading | Not used by Hub, which shows its own loading indicator while a form opens. |
Example: Following Up on a Customer Satisfaction Survey
A support team sends a short Customer Satisfaction Survey after closing each support ticket. Every respondent is thanked by name. Customers who are satisfied are also invited to write a review, and customers who are dissatisfied are told that a team lead will contact them — so nobody who had a bad experience is left wondering whether their feedback was read.
| # | Question type | Question name | Title |
|---|---|---|---|
| 1 | Single-Line Input (required) | first_name | First name |
| 2 | Rating Scale (1–5, required) | satisfaction | How satisfied are you with the support you received? |
| 3 | Long Text | comments | What could we have done better? |
The page should read differently for three groups of respondents:
- Rating 4 or 5 — thank them and link to a review page.
- Rating 3 — thank them for the feedback.
- Rating 1 or 2 — apologize and promise a call back.
1. Write the Default Message
Open the form's Designer tab and click an empty area of the design surface. In the category bar on the right of the Property Grid, click the "Thank You" Page icon, and enter the following in "Thank You" page markup:
<h3>Thank you, {first_name}!</h3>
<p>Your feedback helps us improve our support.</p>
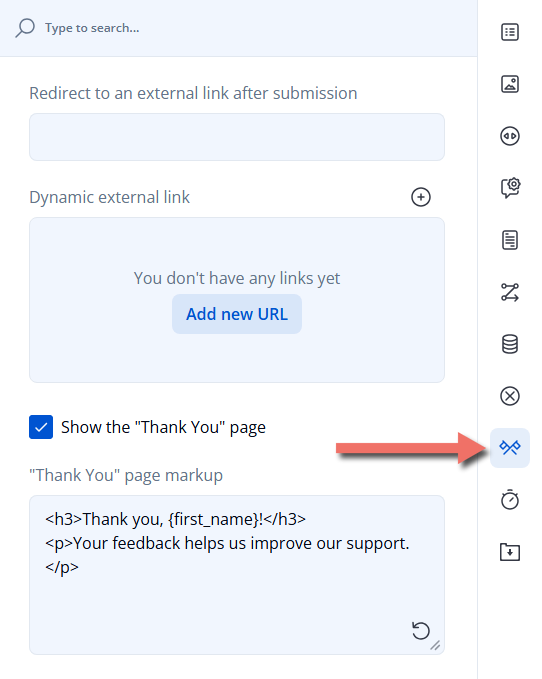
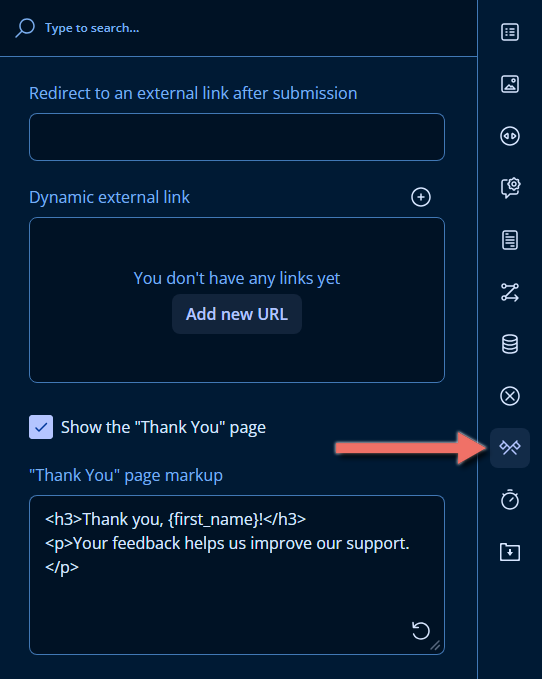
This is the version respondents see when no rule applies — in this example, those who rate their support 3. {first_name} is replaced with the name the respondent entered in question 1.
Click the Reset icon in the corner of "Thank You" page markup to restore "Thank you for completing the survey". Unlike your own markup, the built-in message is translated automatically into the respondent's language.
2. Add a Message for Satisfied Customers
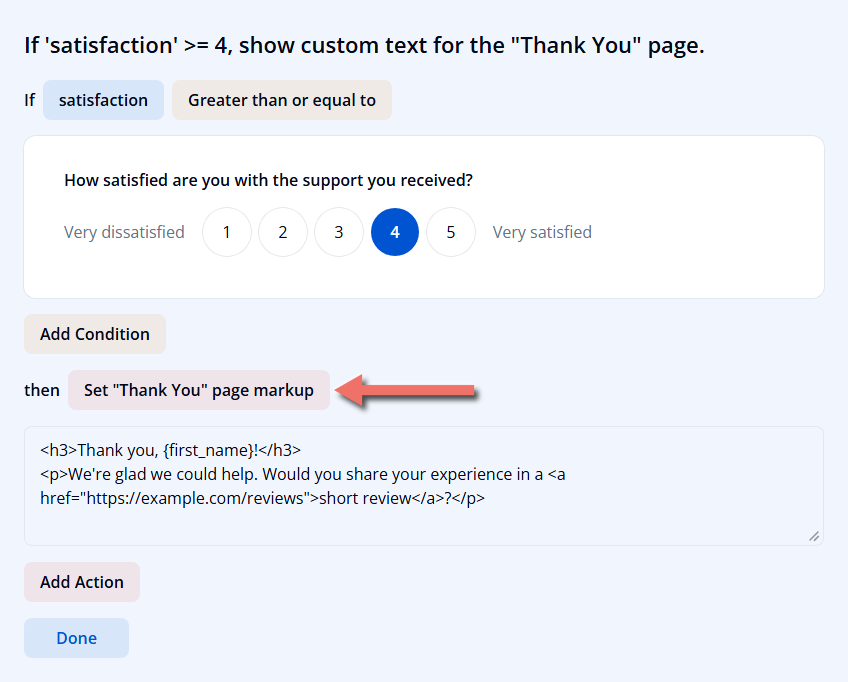
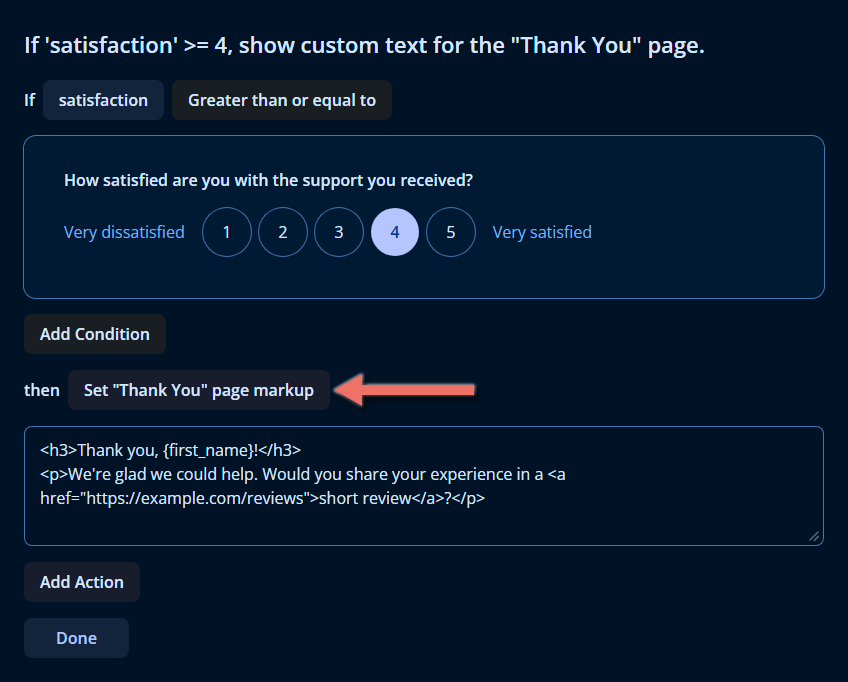
Open the Logic tab and click Add New Rule. Then:
-
In the If row, select the
satisfactionquestion and the Greater than or equal to operator, and click 4 on the rating scale that appears. -
In the then row, open Select action... and choose Set "Thank You" page markup.
-
Enter the markup for this group:
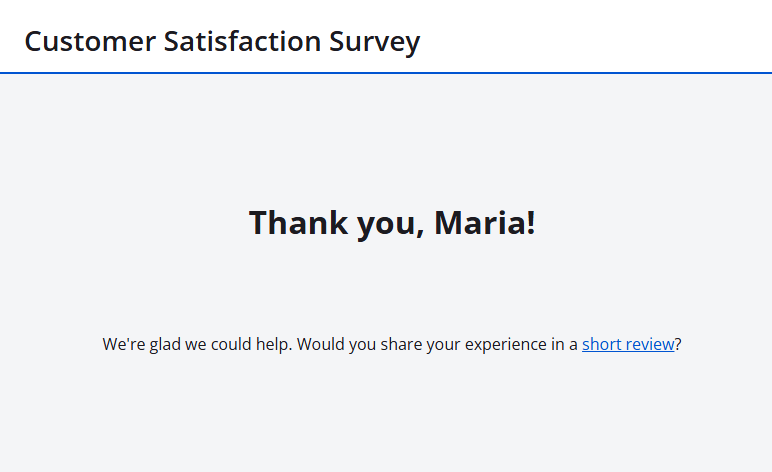
<h3>Thank you, {first_name}!</h3><p>We're glad we could help. Would you share your experience in a <a href="https://example.com/reviews">short review</a>?</p> -
Click Done.
3. Add a Message for Dissatisfied Customers
Click Add New Rule again. Select satisfaction with Less than or equal to and 2, choose Set "Thank You" page markup, and enter:
<h3>Thank you for your honesty, {first_name}.</h3>
<p>We're sorry we fell short. A support team lead will contact you within one business day.</p>
Click Done. The Logic tab now lists both rules:
- If 'satisfaction' >= 4, show custom text for the "Thank You" page.
- If 'satisfaction' <= 2, show custom text for the "Thank You" page.
4. Review the Rules in the Property Grid
Rules with the Set "Thank You" page markup action are stored in the survey's Dynamic "Thank You" page markup setting, just below "Thank You" page markup. Each row shows a rule's condition as an Expression and its HTML markup. Click Show Details (pencil icon) to edit a row, or the + icon next to the setting's name to add a rule directly here.
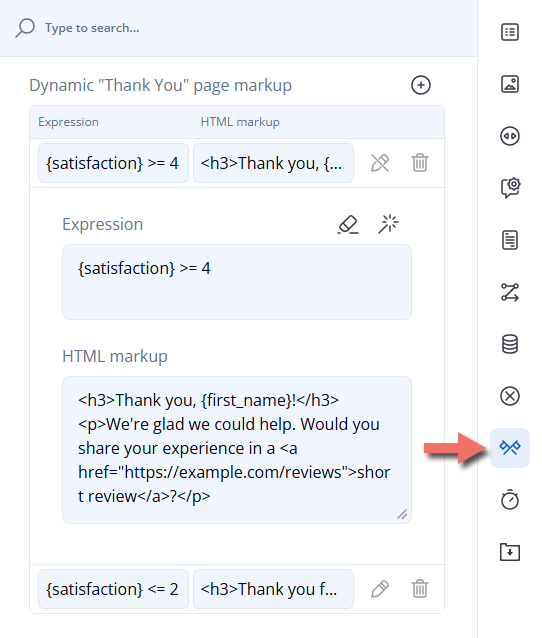
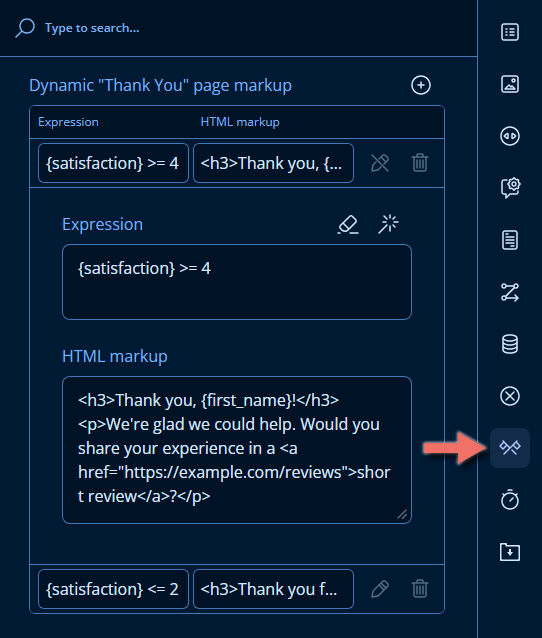
When you add a rule in the Property Grid, type its condition in the logic expression syntax — for example, {satisfaction} >= 4 — or click the magic wand icon to build it with the same editor as in the Logic tab. See Logic Expressions for the available operators and functions.
The rules are checked from top to bottom, and the page shows the markup of the first rule whose condition is true. Write conditions that don't overlap, as in this example, so that the result doesn't depend on the order of the rules.
5. Test the Thank You Page
Open the Preview tab, fill out the form, and click Complete. The Thank You page for the rating you chose appears, followed by the answers you entered. Click Preview Survey Again to try another rating — nothing you submit in the Preview tab is saved.
Then click Save, go to the Forms list, hover over the form's card, and click Share Link. A respondent named Maria who rates her support 5 sees:
Writing the Page Markup
Supported HTML
For security, Hub cleans the markup before it's displayed, keeping only the elements below. Other tags are removed, although the text inside them stays. Scripts, style sheets, embedded frames, and form fields are removed completely.
| Content | Allowed elements |
|---|---|
| Headings and text | h1–h6, p, br, hr, blockquote, pre, code, small |
| Text formatting | strong, b, em, i, u, s, del, ins, sub, sup |
| Lists | ul, ol, li, dl, dt, dd |
| Links | a with an https:, mailto:, or tel: address |
| Images | img with an https: or embedded data: source |
| Tables | table, caption, colgroup, col, thead, tbody, tfoot, tr, th, td |
| Layout | div, span, figure, figcaption |
| Attributes | style, class, title, and role on any element; href, target, and rel on links; src, srcset, alt, width, and height on images |
A few things to keep in mind:
- Links need a secure address. A link to an
http://address loses its address: the text is displayed, but it can't be clicked. Usehttps://. - Links to websites open in a new browser tab, so the respondent's Thank You page stays open.
- Style with inline styles. For example,
<p style="text-align: left">aligns a paragraph to the left instead of the center.
Piping Answers into the Page
Any placeholder that works in a question title works on the Thank You page: answers ({first_name}), the text of a selected choice, custom variables filled in from the form's link, and calculated values. See Text Piping for what each kind of question inserts.
Hub cleans the markup after the answers are inserted, so HTML that a respondent types into a text box follows the same rules — an answer can't add scripts or other unsafe content to the page.
Translating the Page
In a multilingual form, "Thank You" page markup and the markup of each dynamic rule are listed in the Translations tab along with the rest of the form's text. Keep the placeholders unchanged in every language — for example, <h3>Vielen Dank, {first_name}!</h3>. See Form Translation.
Redirecting Respondents to Another Page
Instead of ending on the Thank You page, respondents can be sent to another web page after they submit — for example, your website's own confirmation page, a booking page, or the next step of a sign-up process.
Enter the page's address in Redirect to an external link after submission, at the top of the "Thank You" Page category. Placeholders work in the address too, so you can pass answers on to the page:
https://example.com/thanks?rating={satisfaction}
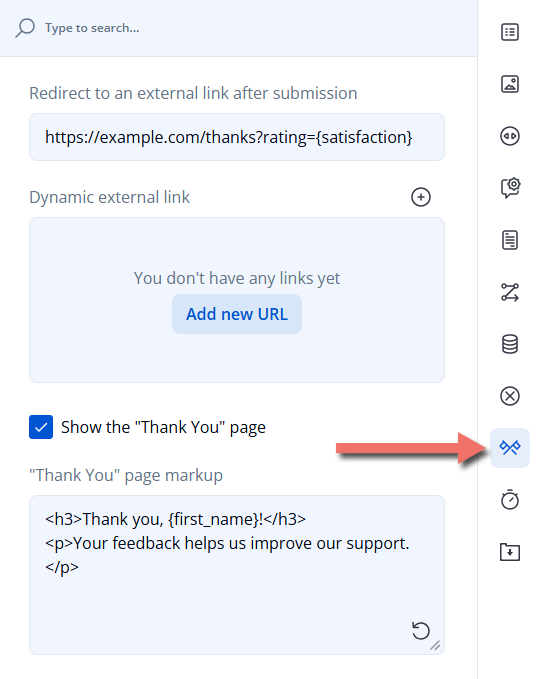
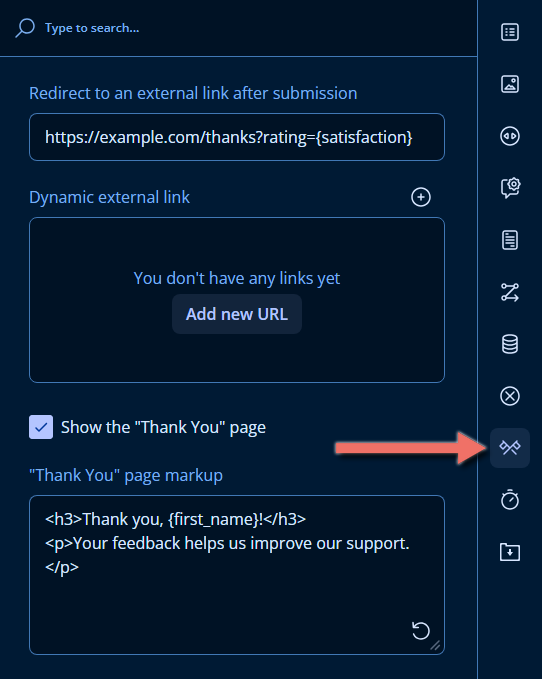
A respondent who rates their support 4 is sent to https://example.com/thanks?rating=4.
How the redirect behaves:
- It waits until the answers are saved. The Thank You page appears for a moment first, and the redirect follows as soon as the submission is saved. If saving fails, the respondent stays on the page, where they can try again.
- Placeholders insert stored values. In an address, a choice question inserts the choice's value, not its text, and nothing is encoded. Pipe numbers and choice values rather than free-text answers, which may contain spaces or characters such as
&that break the address. - Use a full address. Start the address with
https://. An address such as/thanksrefers to a page on the website where the form is opened — your Hub website for a shared link. - Embedded forms redirect the whole page. When the form is embedded in another website, the website's page itself moves to the new address, not just the area that shows the form. See Embed a Form via iframe.
- The Preview tab doesn't redirect. It shows the Thank You page and a notification with the address it would have opened.
To send respondents to different addresses depending on their answers, add rules in Dynamic external link: click Add new URL, and enter an Expression and a URL for each rule. As with the page markup, the first rule whose expression is true is used; when none is, respondents go to the address in Redirect to an external link after submission, or stay on the Thank You page if it's empty.
When Respondents Return to a Completed Form
The Thank You page is shown only right after a submission. A respondent who opens the form again later sees one of the following instead:
| Situation | What the respondent sees |
|---|---|
| Limit one per user is enabled on the form's Form Overview page (private forms only), and the signed-in respondent has already submitted | An Already Responded page: "You have already submitted a response for this form." |
| The respondent opens a link to continue a submission that's already complete | A Thank you page: "This form has already been completed." |
| Limit to one response is set in the survey's General category, and the respondent has completed the form in the same browser | The content of Markup to show if the user already filled out this survey (by default, "You have already completed this survey.") |
Limit to one response remembers respondents with a cookie in their browser. A respondent who switches to another browser or device, uses a private window, or clears their cookies can fill out the form again. When each person must respond only once, use Limit one per user instead.
Important Considerations
- The Thank You page can't be turned off. Hub always shows it on published forms, because it's where respondents see that their answers were saved — the Show the "Thank You" page setting is ignored. To move respondents on right away, use a redirect.
- If a submission can't be saved, the page shows "Failed to submit your form" with the reason and a Try again button instead of your markup. Your markup appears once the answers are saved.
- Pipe only answers the respondent must give. A placeholder for a question that was skipped is left empty, so
Thank you, {first_name}!becomes "Thank you, !". Make the question required, as in the example, or set its Default display value for dynamic texts — see Text Piping. - Renaming a question doesn't update placeholders in the page markup or in redirect addresses. Update them by hand after renaming.
- Test redirects in the published form. The Preview tab shows the Thank You page as respondents see it, but it doesn't save answers or redirect. Use Share Link to try the whole flow.
Related Documentation
- Text Piping — insert answers and variables into titles, descriptions, and the Thank You page.
- Logic Expressions — the operators and functions available in rule expressions.
- Pre-filling and Personalization — fill in variables from the form's link and use them on the Thank You page.
- Form Translation — translate the Thank You page along with the rest of the form.
- Embed a Form via iframe — put a form on your own website.
Technical Reference (JSON Schema)
The example form's Thank You page settings look like this in the JSON Editor. Rules created in the Logic tab are saved in completedHtmlOnCondition, in the order they're checked.
{
  "title": "Customer Satisfaction Survey",
  "completedHtml": "<h3>Thank you, {first_name}!</h3>\n<p>Your feedback helps us improve our support.</p>",
  "completedHtmlOnCondition": [
    {
      "expression": "{satisfaction} >= 4",
      "html": "<h3>Thank you, {first_name}!</h3>\n<p>We're glad we could help. Would you share your experience in a <a href=\"https://example.com/reviews\">short review</a>?</p>"
    },
    {
      "expression": "{satisfaction} <= 2",
      "html": "<h3>Thank you for your honesty, {first_name}.</h3>\n<p>We're sorry we fell short. A support team lead will contact you within one business day.</p>"
    }
  ],
  "pages": [
    {
      "name": "feedback",
      "elements": [
        { "type": "text", "name": "first_name", "title": "First name", "isRequired": true },
        {
          "type": "rating",
          "name": "satisfaction",
          "title": "How satisfied are you with the support you received?",
          "isRequired": true,
          "minRateDescription": "Very dissatisfied",
          "maxRateDescription": "Very satisfied"
        },
        { "type": "comment", "name": "comments", "title": "What could we have done better?" }
      ]
    }
  ]
}
Survey Properties
| Property | Type | Default | Description |
|---|---|---|---|
completedHtml | string (localizable) | "Thank you for completing the survey" | "Thank You" page markup. |
completedHtmlOnCondition | array of { expression, html } | [] | Dynamic "Thank You" page markup. The first item whose expression is true replaces completedHtml. |
navigateToUrl | string | — | Redirect to an external link after submission. Placeholders insert stored values without encoding. |
navigateToUrlOnCondition | array of { expression, url } | [] | Dynamic external link. The first item whose expression is true replaces navigateToUrl. |
showCompletePage | boolean | true | Show the "Thank You" page. Ignored by Hub's published forms, which always show the page. |
cookieName | string | — | Limit to one response: the name of the browser cookie that marks the form as completed. |
completedBeforeHtml | string (localizable) | "You have already completed this survey." | Markup to show if the user already filled out this survey. Used only with cookieName. |
loadingHtml | string (localizable) | "Loading Survey..." | Markup to show while survey model is loading. Not used by Hub. |
Example — Redirect Depending on the Answer
{
  "navigateToUrl": "https://example.com/thanks?rating={satisfaction}",
  "navigateToUrlOnCondition": [
    {
      "expression": "{satisfaction} >= 4",
      "url": "https://example.com/reviews/new?rating={satisfaction}"
    }
  ]
}
Respondents who rate their support 4 or 5 go to the review page; everyone else goes to https://example.com/thanks, with their rating added to the address.