Form Translation
Endatix Hub offers two distinct workflows for translating your forms. You can translate content contextually while building your form in the Designer, or use the dedicated Translation tab to manage all text strings in a centralized matrix. This flexibility allows you to handle quick edits on the fly or manage large-scale localization projects with external agencies.
Contextual Translation in the Designer
The Designer tab allows you to see exactly where your text will appear as you translate it. This "What You See Is What You Get" (WYSIWYG) approach is ideal for fixing layout issues caused by varying text lengths in different languages.
Changing the Current Language
To start translating in the Designer:
- Select the Survey object (click the background of the form or select "Survey" in the breadcrumbs).
- Open the Property Grid on the right.
- Locate the General category.
- Use the Language dropdown (often labeled "Default language" or "Current language") to switch between locales.
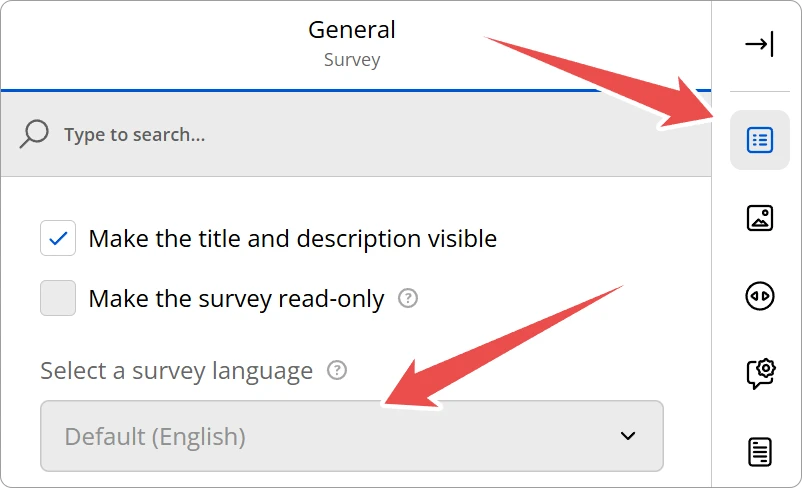
Once you select a non-default language (e.g., French), the design surface will update. Any text you edit in the form builder—such as question titles, descriptions, or choices—will be saved specifically for that selected language. If you switch back to the default language, your original text remains unchanged.
The Translation Tab
For a comprehensive view of all text within your form, use the Translation tab. This interface presents your content in a data grid, with the default language in the first column and additional languages in subsequent columns.
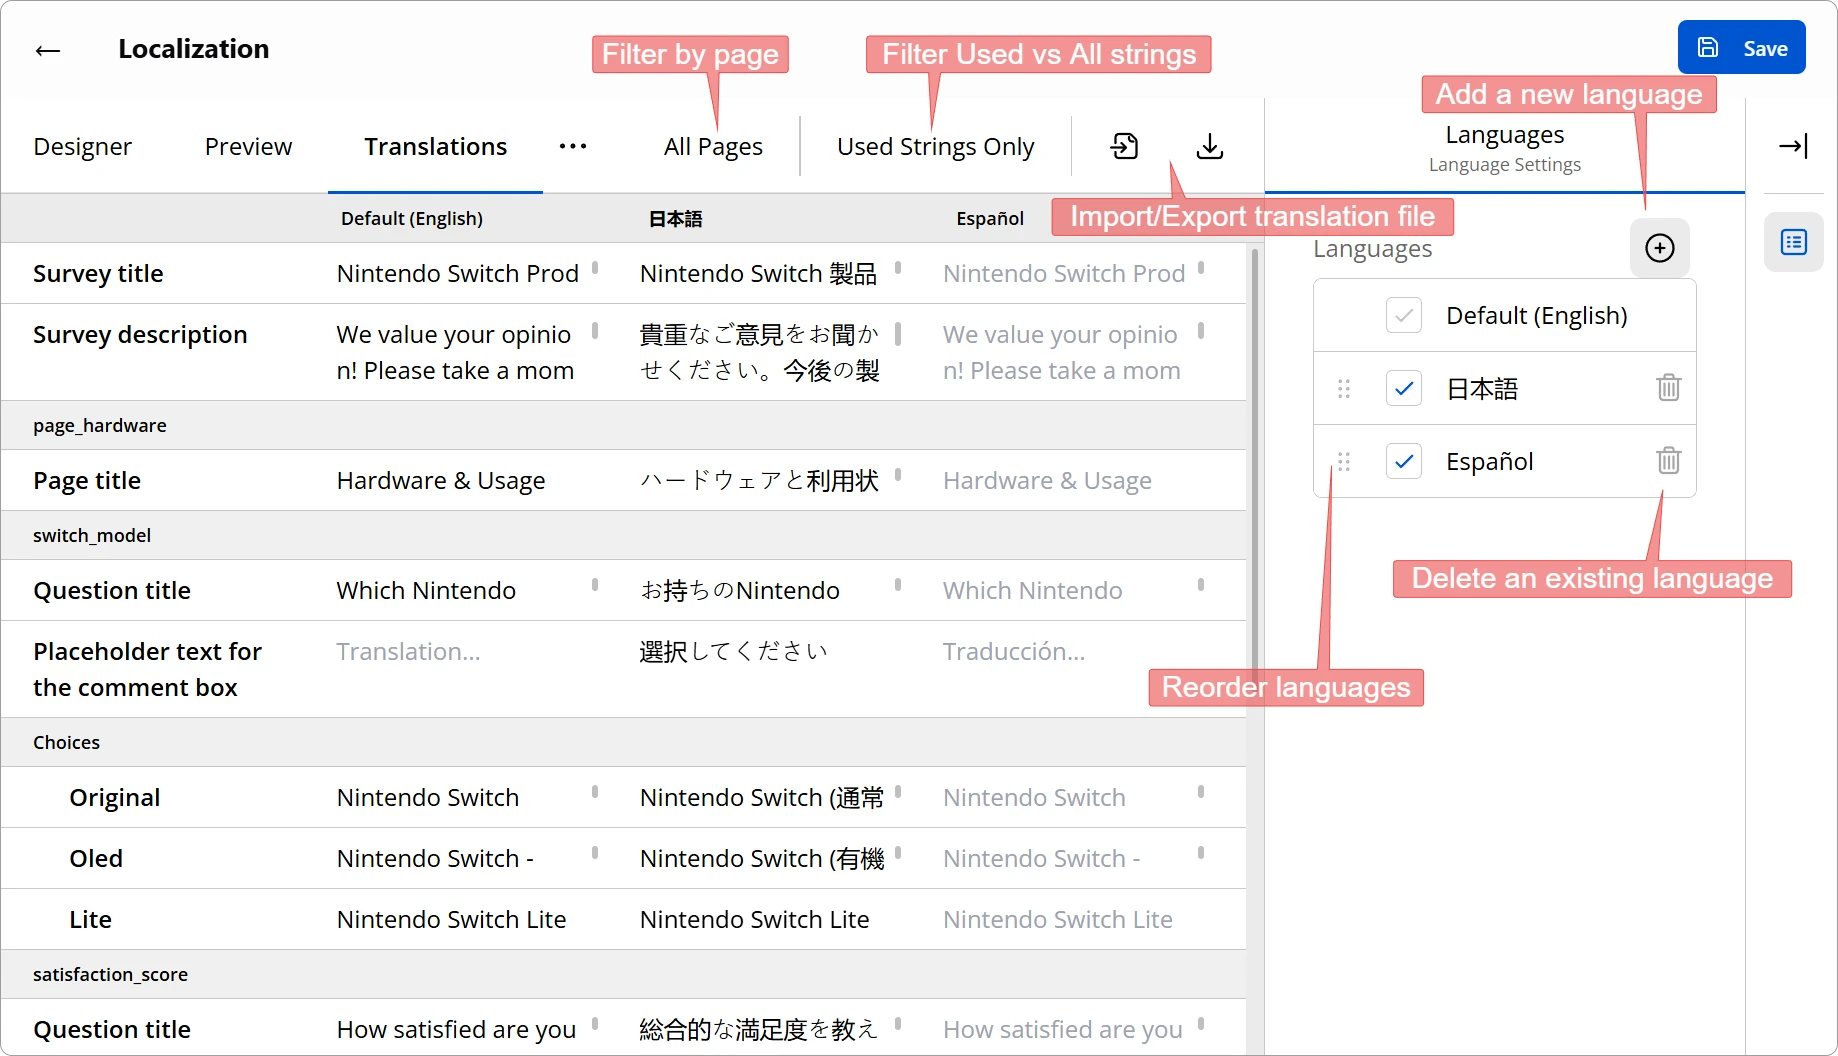
Adding and Managing Languages
To add a new translation:
- Click the + Add Language button in the toolbar.
- Select the desired locale (e.g.,
de-DEfor German) from the list. - A new column will appear in the grid, allowing you to input translations side-by-side with the original text.
You can remove a language by hovering over the column header and clicking the Remove (trash icon) button.
Filtering Strings: Used vs. All
Forms often contain hidden properties or system text that may not require translation. To help you focus on what matters, the Translation tab offers a filter toggle:
- Used Strings Only: Displays only the text that is currently visible and active in your form (e.g., titles, error messages, choice text). This is the recommended view for most translators.
- All Strings: Displays every translatable property available in the underlying JSON schema, including those for features you might not be using.
Use the filter dropdown in the toolbar to switch between these views.
Exporting and Importing via CSV
For large projects, it is often more efficient to work in a spreadsheet or send the text to a professional translation service. Endatix Hub supports CSV (Comma Separated Values) import and export.
To Export:
- Click the Export to CSV button.
- The file will download automatically.
- Open the file in Excel or Google Sheets. You will see columns for "Key" (internal ID), "Description" (context), and columns for each language.
When the external translation is done in Microsoft Excel, the CSV file's data needs to be imported into a blank workbook, as opposed to opening it directly. For more information see Opening a translation CSV file in Excel.
To Import:
- Save your translated spreadsheet as a
.csvfile. - Click the Import from CSV button in the Translation tab.
- Select your file.
- The grid will automatically populate with the updated text.
When working with the CSV file, do not modify the "Description" column or any of the column headers. Endatix uses these keys to map the translations back to the correct questions and properties. Changing them will break the link between your translation and the form element.