Session Bridge
Session Bridge enables seamless cross-platform authentication by allowing users to exchange tokens from one application (e.g., a mobile app) to create a session in another application (e.g., a web application). This provides a smooth user experience when users need to access the web application after authenticating in a mobile app.
Introduction
What is Session Bridge?
Session Bridge is a token exchange mechanism that allows:
- Mobile-to-Web: Users authenticated in a mobile app can seamlessly access the web application
- Cross-Platform Sessions: Maintain authentication state across different platforms
- Unified Experience: Users don't need to log in again when switching platforms
Use Case
A typical scenario:
- User authenticates in a mobile app and receives a JWT token
- User wants to access the web application
- Instead of logging in again, the mobile app exchanges its token for a web session
- User is automatically signed into the web application
Benefits
- Seamless user experience: No need to log in multiple times
- Reduced friction: Users can switch between platforms effortlessly
- Unified authentication: Single sign-on experience across platforms
- Secure token exchange: Uses OAuth 2.0 token exchange protocol
Prerequisites
- Keycloak authentication configured (see Keycloak Setup)
- Lightweight JWT tokens enabled in Keycloak
- Client roles configured for token exchange
- Endatix Hub and API running
Understanding Session Bridge
The session bridge process can be visualized with the following diagram:
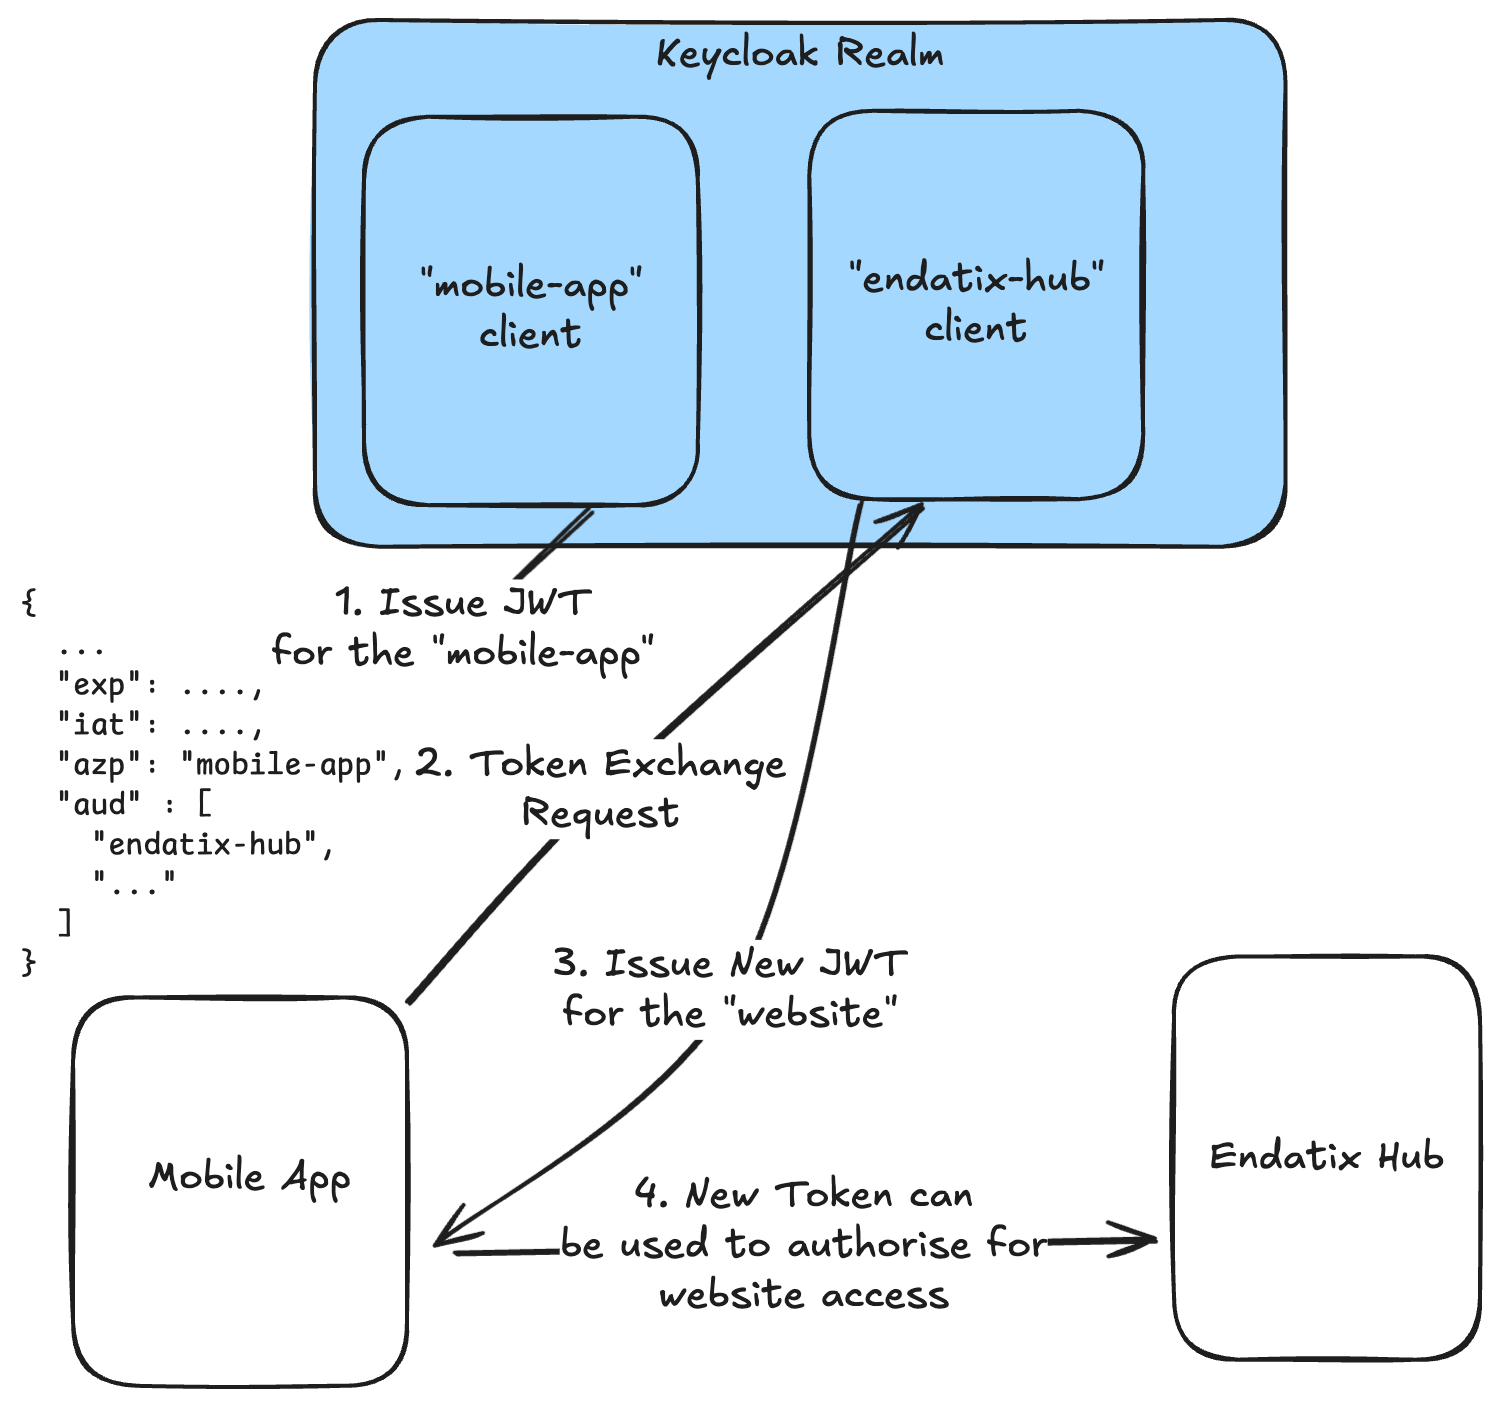
Explaining the diagram:
- Keycloak issues a JWT token to the mobile app ("mobile-app" client)
- Mobile app sends token to Endatix Hub's session bridge endpoint
/api/auth/session-bridge - Endatix Hub exchanges the token with Keycloak via standard OAuth 2.0 Token Exchange protocol. On successful exchange, Keycloak issues a new token for the web client ("endatix-hub" client)
- Mobile app ca use the new token to authenticate the user in the web application or enjoy a native session established in the mobile app
Keycloak Configuration for Token Exchange
This guide is focused on session bridge implementation using Keycloak token exchange. Keycloak provides a standard OAuth 2.0 Token Exchange protocol for token exchange. This protocol allows the mobile app to exchange its token for a web session.
Step 1: Enable Lightweight JWT Tokens
Lightweight tokens are essential for token exchange as they reduce token size and improve performance (smaller tokens mean faster transmission and no PII disclosure):
- Go to your realm in Keycloak Admin Console
- Click on "Clients"
- Select your client (e.g.,
endatix-hub) - Go to "Advanced settings" tab
- Find "Always use lightweight access token" and turn the switch to On
- Click "Save"
Lightweight tokens contain only essential claims (exp, iat, jti, iss, typ, azp, sid, scope) and exclude role/permission information. This makes them smaller and more suitable for token exchange scenarios. More info at Keycloak Keycloak Lightweight Access Tokens documentation.
Step 2: Configure Audience Claim for Token Exchange
For token exchange to work, the JWT issued to the source client (e.g., mobile app) must include the target client (e.g., web app) in the audience claim.
The Keycloak Token Exchange documentation states that: "The subject_token sent to the token exchange endpoint must have the requester client set as an audience in the aud claim. Otherwise, the request would be rejected.".
Simply put, that means that the JWT issued by the original client, should have the client-id in the value of the audience claim. In the example above, the JWT issued by the mobile app should have the client-id endatix-hub in the value of the audience claim.
Step 2.1: Add Audience Resolve Mapper
- In Keycloak Admin Console, go to "Client Scopes"
- Select the "Roles" scope
- Go to the "Mappers" tab
- Find or add the "audience resolve" mapper:
- If it doesn't exist, click "Add mapper" → "By configuration"
- Select "Audience Resolve"
- Ensure the mapper is added to the lightweight access token by turning the toggle On
- Click "Save"
The aud claim in the source token must include the target client ID. This is a Keycloak requirement for token exchange. The audience resolve mapper ensures this requirement is met.
Step 2.2: Configure Client Roles
Users eligible for token exchange must have at least one client role from the target client:
- Go to "Clients" in Keycloak
- Click on your target client (e.g.,
endatix-hub- the web application client) - Go to the "Roles" tab
- Create client-specific roles if they don't exist
- Assign these roles to users:
- Go to "Users" → Select a user
- Go to "Role Mappings" tab
- Click "Assign role"
- Filter by your target client and select the roles
- Click "Assign"
If your mobile app client is mobile-app and your web app client is endatix-hub, users need at least one endatix-hub role to exchange tokens from mobile-app to endatix-hub.
Audience Requirement
The key requirement for token exchange is that the source token's aud claim must include the target client ID. For example:
{
  "exp": 1761745037,
  "iat": 1761744137,
  "jti": "onltro:7ea67683-1be2-9341-ae50-08745b9a69e3",
  "iss": "http://localhost:8080/realms/endatix",
  "typ": "Bearer",
  "aud": ["endatix-hub"],
  "azp": "mobile-app",
  "sid": "1a12455a-da5c-45d0-9845-5f3f1493078a",
  "scope": "openid email roles profile"
}
In this example:
azp(authorized party) ismobile-app(the source client)aud(audience) includesendatix-hub(the target client)- This allows
mobile-apptokens to be exchanged forendatix-hubtokens
Step 3: Endatix Hub Configuration
If you have already set up Keycloak authentication, no additional configuration is needed.
Step 4: Verify Session
The session bridge endpoint is available at the Endatix Hub url /api/auth/session-bridge via a POST request. Send a POST request with the mobile JWT token:
const response = await fetch("/api/auth/session-bridge", {
  method: "POST",
  headers: {
    "Content-Type": "application/json",
  },
  body: JSON.stringify({
    token: "mobile-jwt-token-here",
  }),
});
After a successful session bridge, the user should be automatically authenticated in the web application. You can verify this by going to the /api/auth/me endpoint in the Endatix Hub and checking the response.
✅ Success Response
{
  "success": true,
  "user": {
    "id": "0f6d8b28-e761-4033-8e84-2ddebcec49ce",
    "name": "External User",
    "email": "external@endatix.com"
    ...
  }
}
Troubleshooting
If you encounter any issues, you can troubleshoot by inspecting the Session Bridge error response. Below is a summary of possible error cases:
Error Case 1: Session Bridge is not activated
{
    "type": "https://datatracker.ietf.org/doc/html/rfc7231#section-6.5.3",
    "title": "Forbidden",
    "detail": "Session bridge is not allowed",
    "status": 403
}
Error Case 2: Missing access_token from payload
{
    "type": "https://datatracker.ietf.org/doc/html/rfc7231#section-6.5.1",
    "title": "Bad Request",
    "detail": "Missing access_token. Please provide a valid access token.",
    "status": 400
}
Error Case 3: Keycloak not enabled
{
    "type": "https://datatracker.ietf.org/doc/html/rfc7231#section-6.6.1",
    "title": "Session bridge server error",
    "detail": "Missing required auth provider. Please contact support.",
    "status": 500
}
Error Case 4: Keycloak not accessible or reachable
{
    "type": "https://datatracker.ietf.org/doc/html/rfc7231#section-6.6.1",
    "title": "Network Error",
    "detail": "Network connection failed. Please check your internet connection.",
    "status": 500,
    "errorCode": "network_error"
}
Error Case 5: Keycloak token exchange fails (e.g. Keycloak rejects token)
{
    "type": "https://datatracker.ietf.org/doc/html/rfc7231#section-6.5.1",
    "title": "Bad Request",
    "detail": "The provided data is invalid.",
    "status": 400,
    "errorCode": "validation_error"
}
Error Case 6: Token exchange, but validation of the received token fails
{
    "type": "https://datatracker.ietf.org/doc/html/rfc7231#section-6.5.1",
    "title": "Bad Request",
    "detail": "Session bridge token exchange failed. Insufficient information to establish a session.",
    "status": 400,
    "errorCode": "EXCHANGED_TOKEN_INVALID",
    "fields": {
        "expires_at": [
            "Expected date, received null"
        ]
    }
}
Error Case 7: Unexpected error during session bridge operation
{
    "type": "https://datatracker.ietf.org/doc/html/rfc7231#section-6.6.1",
    "title": "Session bridge server error",
    "detail": "Something happen under the bridge",
    "status": 500
}
Security Considerations
Token Exchange Security
- HTTPS Required: Always use HTTPS in production for token transmission
- Token Validation: Keycloak validates tokens before exchange
- Client Authentication: Token exchange requires valid client credentials
- Audience Validation: Keycloak ensures tokens can only be exchanged for authorized clients
Best Practices
- Short Token Lifetime: Use appropriate token expiration times
- Secure Storage: Store client secrets securely
- Audit Logging: Enable audit logging in Keycloak
- Monitor Exchange: Log and monitor token exchange events
- Error Handling: Implement proper error handling in client applications
Next Steps
- Learn about External Authorization for role-based access control
- Set up Keycloak RBAC for advanced authorization
- Review Keycloak Setup for basic authentication